• Skip to primary navigation
  • Skip to main content

Content Mastery Guide

Editor and Ghostwriter

  • Visit LD Editorial

How to Streamline Your Blog Post Publishing and Promotion Tasks

May 5, 2014 By Linda Dessau

One of the best things I’ve done to streamline the publishing and promotion process is to insert a template at the bottom of my blog post drafts in Word. I do this for my own posts at Content Mastery Guide, the guest posts I write for other sites, and the posts I write and manage for clients.

Template for blog promotion text

For my own posts, the template looks like this:

Blog publishing and promotion checklist

I also include some reminders about formatting issues with my WordPress template (e.g., I need to save a second version of my photo in a different size as the “Featured Image” so it displays correctly in my weekly blogging tips newsletter).

With this template in place, the rest of my publishing and promotion tasks go much more smoothly. Plus, with these details at the bottom of every blog post draft, I can easily outsource the blog publishing and promotion tasks to my team for my monthly blog writing clients.

Checklist for blog post publishing and promotion

business blogging checklist for publishing and promotion
© Dmitry – Fotolia.com

I wrote the following set of instructions for a blogging consultation client based on what I was doing at the time. This was before I started using Buffer, but I still approach the process in much the same way.

In MS Word:

  • Create a blog post outline document as I’m planning the post
  • Re-save the outline as a new document as I draft the post so I preserve my original list of links and resources
  • Proofread and finalize the blog post text
  • Complete promotional text as per template

At Fotolia:

  • Choose and purchase photo for blog post (free options available at http://www.sxc.hu/ and http://photopin.com/ – note attribution requirements)

At Pic Monkey [Update Mar 26, 2018 – Now using Pixl]:

  • Re-size photo as needed and set file name (include a keyword where possible)
  • Create second version of picture with text (e.g., a quote or headline from the post, my website URL, photo copyright information)

In blog/website administrative dashboard (WordPress):

  • Create new post
  • Paste in title and text (use “Paste From Word” option) (Update May 11, 2014: Now you can paste directly from Word into WordPress)
  • Upload photo and set alternative text (include a keyword where possible)
  • Paste in blog post excerpt from Word doc template
  • Fill in SEO fields
  • Set category or categories – choose from existing category choices
  • Publish or schedule post

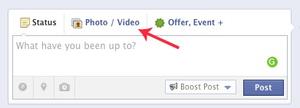
On Facebook (immediately after publishing):

  • Click “add photo” and upload the blog post photo
  • Paste the Facebook message from the Word doc template
  • At the end of the message, paste the permanent link (permalink) of the blog post
  • After the link, add one or two relevant hashtags, e.g., #blogging #smallbiz #marketing
  • If this is a guest post, or reference to another expert, link to that person’s Facebook page by typing @ and the name, then clicking the page from the options that drop down
  • Publish update

UPDATE (November 9, 2014): Facebook is now giving more visibility to posts that contain links with thumbnail images, versus those with uploaded photos (they consider that “click-baiting“). So it’s best to put your link directly into the status update box so just the small thumbnail image is displayed.

On Twitter.com (immediately after publishing):

  • Click “add photo” and upload the blog post photo
  • Paste the text of the best tweet from Word doc template
  • At the end of the message, paste the permanent link (permalink) of the blog post
  • After the link, add one or two relevant hashtags, e.g., #blogging #smallbiz #marketing
  • If this is a guest post, or reference to another expert, add the person’s Twitter name
  • Publish tweet

On LinkedIn (immediately after publishing):

  • Paste the LinkedIn message from the Word doc template
  • At the end of the message, paste the permanent link (permalink) of the blog post
  • If this is a guest post, or reference to another expert, link to that person’s LinkedIn profile and/or company page by typing the name, then clicking the page or name from the options that drop down)
  • Share posts the same way in LinkedIn groups by starting a new discussion, if appropriate to the culture of that particular group
  • Share posts the same way to your company page (but you cannot link to another profile or page from a company page update)

In HootSuite or Buffer:

  • Schedule additional tweets for later in the week

In email broadcast system (if not using an automated RSS-to-email service):

  • Open HTML template or create copy of previous broadcast
  • Paste in text of blog post excerpt along with the permalink so people can read the entire post
  • Add blog post photo
  • (Optional) Add additional newsletter content, e.g., personal note, upcoming events, featured products/services
  • Send or schedule broadcast

It’s taken many years to streamline my process to this level, and I love how much more efficient it makes me! Do you use any templates or checklists for managing your blogging tasks?

Filed Under: Blogging Basics, Blogging Consistently, Social Media

Creating Curated Content for Social Media, Email and Your Blog

April 20, 2014 By Linda Dessau

Welcome to the third and final post in a series about content curation. First we got started by organizing topics and the people sharing about those topics, then we looked at how to quickly share other people’s content with your own networks.

In the second post I noted the importance of adding your own commentary to what you’re sharing. This reminds readers of your expertise in the topic and your connection to the industry.

In this post we’ll discuss four types of content you can create by adding your own slant to someone else’s material.

1. Curated social media updates

There are tools that make it quick and easy to share content with your networks as soon as you find it (HootSuite, Buffer and the LinkedIn bookmarklet).

You may also choose to manually create new social media updates when you have a link to share. Here are some things to keep in mind when you do:

a) Use the permalink. Whether you’re recommending a blog post, article, video, social media update or another online resource, always be sure you’re using the permalink (permanent link) for the specific item, rather than the general site address. A permalink looks like this: https://www.contentmasteryguide.com/2014/03/mastering-social-media.html, while a general address looks like this: https://www.contentmasteryguide.com/blog.

b) Super-size your photos on Facebook and Google+ (*see UPDATE below). You may have noticed on these sites that some images show up full-sized and glorious, while others are displayed as a tiny thumbnail. To super-size a photo on Facebook or Google+, you must add your photo to the status update first.

Facebook share window
Before you type your comment and link, upload your photo.

c) Super-size with Buffer. Even when it’s not your post or image, you can still super-size your photo. With the Buffer browser extension, you can super-size your photos by right-clicking on a photo from the page you want to share. Select, “Buffer this image,” customize the text with your own commentary, and schedule or post the update. Voilà!

*UPDATE (September 13, 2014): Facebook is now giving more visibility to posts that contain links with thumbnail images, versus those with uploaded photos (they consider that “click-baiting“). So it’s best to put your link directly into the status update box so just the small thumbnail image is displayed.

2. Curated newsletters

Compared with social media, many marketing professionals consider email a more intimate and direct tool for reaching your audience and deepening your relationship. If you’re not sure what to include in an email newsletter, consider curated content.

a) Be a trusted filter. Mari Smith is the author of The New Relationship Marketing and Facebook Marketing: An Hour a Day. In her weekly newsletter The Social Scoop, she offers her top three recommendations for blog posts about social media marketing. Since she reads and shares dozens of quality links every week, her readers anticipate and appreciate seeing which three she’ll choose, and we trust they’ll be highly useful.

b) Offer other ways to connect. If readers are enjoying the links you share, remind them to follow you on social media and on your blog to see more of the same.

c) Remember the marketing part of email marketing. Along with the valuable information you’re sharing from others, remind your readers what your company has to offer. Here are some tips about how blogging and email work together.

3. Personal messages with curated content

You know that it’s important to stay in touch with key contacts like prospective customers, referral sources and vendors, yet these people aren’t always on your newsletter list. How do you keep it all straight, and what do you say when you follow up? Curated content can help.

a) Follow up. If there’s an article you’ve read recently that relates to a recent conversation at a networking event or other meeting, send it along with a brief note explaining why you think it will be useful.

b) As it happens. As you’re browsing content in your day-to-day travels, keep your contacts in the back of your mind, along with any specific concerns you discussed. When you find something relevant, you can paste the permalink into an email, or you can share with individual connections when you find something via LinkedIn, Facebook or Google+. On mobile browsers, look for the option to share or send a link directly by email.

c) Set a schedule. Use a customer relationship management (CRM) system, your calendar or a task management system like Wunderlist to remind yourself to keep in touch. Browse the links you’ve shared recently and consider what this individual would find most helpful and relevant.

4. Curated blog posts

In between your own original posts, you may want to offer your blog readers additional insights and perspectives from other experts in your field, or related fields. This is a great way to keep your content flowing consistently, build and deepen relationships with industry leaders, and learn new ideas.

Experiment with these different styles of curated blog posts:

a) Theme post. This is the method I recommend and implement for my content curation clients. Browse the content you’ve shared in the past week or two, and look for a common theme that is aligned with your core content categories. Add an introduction to the theme, and say a few words about each link, including a brief pertinent quote.

b) Weekly or monthly round ups. Present a list of links with a brief description of each.

c) Embedded social media posts. For more interactivity and visual interest, embed one or several social media updates right into your post. You can do this with tweets, Facebook updates, YouTube and Vine videos, Google+ posts and others. Preface each with your own commentary and description.

While I’m still biased towards creating your own high-quality content, sharing other people’s content helps you round out your offerings and keep showing up where your contacts will see you.


Want help with your content curation? Learn more about our content curation services.

Filed Under: Blog Topic Ideas, Blogging Consistently, Content Curation, Content Marketing Ideas, Social Media

How to Quickly Share Other People’s Content With Your Social Networks

April 16, 2014 By Linda Dessau

Content curation is the process of filtering out the best information you find on the web and sharing that with your network. By sticking with a set of core topics related to your business, content curation can supplement the original content you’re creating yourself (e.g., blog posts).

Essentially, you want to be able to answer yes to both of these two questions:

  1. Will my network find this interesting, valuable, relevant and/or entertaining?
  2. Will this link reinforce my business’s expertise in one of our core topic areas?

How to share content from social media sites

In a previous article, we discussed how to get started with content curation so that you’re positioned to discover the best and most relevant material for your particular audience and business.

The standard social media etiquette is to give credit to the content creator – otherwise it may appear as though you wrote the piece. When you retweet (RT) someone’s status update on Twitter, or use the Share buttons on Facebook, LinkedIn or Google+, it’s obvious that it’s someone else’s content.

If you quote from or modify the tweet (instead of RT, type MT for “modified tweet”), it’s your responsibility to credit the person who created the content (e.g., by @username) and (when applicable) where it appeared or who shared it with you (e.g., by @username via @username2).

I agree with @jeffkorhan here – for comments and conversation, social media is better than your blog http://t.co/RqZuT6atUZ

— Linda Dessau (@lindadessau) April 7, 2014

How to Find Your ‘Forever’ Hashtag http://t.co/xqJymX49WB #Twitter trick of the week by @jack_mattr via @steamfeedcom

— Linda Dessau (@lindadessau) April 15, 2014

Add value with commentary

Let people know why you’re recommending the link, and how the content will help them. You can mention what you enjoyed or learned most from the post, include a brief quote, or share a fact about the author.

How to share content right from the web

Great news! You can share content you’re reading on the web, without having to log into any of your social network sites.

Using the site’s own social sharing buttons will give valuable statistics to the site owner. Using your own sharing tool such as the HootSuite Hootlet or the Buffer extension can help you quickly create a new status update on a variety of social media sites, and also see stats about whether people are clicking on your links.

Example of social sharing buttons on a blog
Check the site’s sidebar and bottom of the post for social sharing buttons.

Before you share your update, be sure the author’s username is included for whichever social media network you’re posting to. This is another good reason to not automatically cross-post the same message to more than one site.

To find the author’s Twitter handle (username), check the blog’s sidebar or Contact Us page for the blog’s social media profiles. Adding the username is a great way to not only credit the source of the content, but to build relationships with new colleagues and add value to the ones you already have. People will appreciate you sharing their content, and if you include their username they’ll be notified that you mentioned them.

Twitter handles are easy to add with the HootSuite Hootlet or with Buffer. To add a username to a LinkedIn update right from the web you’ll need to use the LinkedIn bookmarklet. From the Tools page, look for Sharing Bookmarklet near the top of the screen and follow the instructions to add the icon to your browser.

Install LinkedIn bookmarklet

Now you can add a username for any of your LinkedIn connections (or a company, whether or not you follow their page). Simply start typing the personal or company name. Options will drop down and you can choose the name you want. You’ll know you’ve done it correctly if the name has a shaded background.

LinkedIn bookmarklet with username

Note: For Google+, search for extensions for your particular web browser. You can use sharing tools to post updates to Facebook from the web, but if you want to get someone’s attention by using their company or personal name, you’ll need to go right to Facebook.com.

In an upcoming post to close out this series about content curation, I’ll explain how to create curated content for social media, email and your blog.


Want help with your content curation? Learn more about our content curation services!

Filed Under: Content Curation, Social Media

How Content Curation Keeps You Visible and Valuable to Your Network

March 30, 2014 By Linda Dessau

There is a lot of information out there, and the people in your network are probably feeling overwhelmed by it all. This can be an unfortunate source of stress for them, but it’s also an important opportunity for you.

What is content curation?

Content curation is the process of scouring the Internet, filtering out the junk (unfortunately there’s a lot of that), and discovering the most valuable, relevant and helpful content about a particular topic. By sharing those gems with your network, you accomplish these important objectives:

  • Build your personal brand (reputation) as an expert in the topic
  • Be more active and visible on social media
  • Enhance your relationships by being helpful

(Guess what? Those are also three of the most important goals of business blogging!)

Whether you share other people’s content on your own blog, on social media, or in other ways (we’ll cover these options in a separate post), it’s worth learning how to do it well.

Here are the three steps I recommend for getting started with content curation:

1. Define your content categories

Folders for content curation categories
© 4designersart – Fotolia.com

Just as it’s essential to create and stick to a set list of categories on your business blog, it’s also important to mindfully select the topics you will share about on social media.

Start with the problem you solve with your particular product or service. Then branch out to a few related topics. Filter all of these possibilities through the lens of what will be most valuable, interesting and relevant to your ideal customer.

For example, while I blog exclusively about business blogging and social media, on social networks I also share resources about small business, marketing, and productivity, because I know that will be helpful to my ideal customers (small business owners and marketing professionals who serve small businesses). I also share local items to support charities and businesses in Barrie (because blogging is giving).

By curating a set list of topics, you send a unified message of what your business is about. (Click to tweet)

2. Organize your content sources

Content is likely flowing to you in an abundance of formats, but there are tools that make it easier to quickly find what you need, or save something to come back to later.

In email:

You can apply labels, filters, folders or rules to group together your best sources into categories so their latest contributions are always at your fingertips. With Gmail, for example, the “Promotions” and “Social” tabs can be a treasure trove of resources you may want to share with your network.

On social media:

On Twitter, you can create a list for each of the categories you want to curate content from. As you discover new sources of people who are either creating or sharing the best articles in those topics, add their Twitter account to your list.

Once you’ve created your lists, organize them for easy viewing with the free social media dashboard Hootsuite (see: How to Spend Only 10 Minutes Per Day on Twitter).

On Facebook, you can create lists of friends who tend to share content that would be useful to your audience. You can also use interest lists to organize company pages the same way. Then when it’s time to curate (see #3 below), you can filter your view to only see the posts from people who share about particular topics.

On LinkedIn, join groups that center around the topics you’ve defined in your categories. Then you can browse discussions in these groups for links people have shared.

You certainly don’t need this level of organization in all these social networks, and some (Facebook) are more finicky than others. Experiment with the network(s) you use the most.

Outsourcing tip: Once you’ve identified your sources, curation can easily be outsourced. Ask a team member to review blog posts, social media updates, or newsletters from these people and gather up links for you to approve and post.

3. Batch your curation time with social media scheduling tools

Of course you can curate content immediately as you find it, but unfortunately that can interrupt whatever activity you were doing and take you down a rabbit hole of unproductivity. That’s one of the biggest complaints I hear from business owners who are trying to incorporate more content/social media marketing.

Instead, schedule specific time in your week for checking your best content sources, exploring the web, learning new ideas, and sharing the best of what you find. By setting a time limit and a goal of curating content, you turn what could have been aimless wandering (which Alexis Grant says also has its benefits) into a purposeful marketing activity.

Tools like Buffer and Hootsuite (and there are many others) allow you to schedule social media updates in order to spread them through the week. This is a more balanced approach and ensures your social media streams will have consistent activity that provides value to your readers.

If you come across a relevant article outside of your set curation times, email it to yourself, add it to a bookmarks folder, or try the superbly simple saved.io (thanks to Belle Beth Cooper for the discovery).

Remember: Whenever you schedule content on social media, check back for reactions so you can continue the conversation. (Click to tweet)

As an important extension of creating your own original content about your area of expertise, curating content about that topic helps solidify your credibility as a valuable resource. These initial steps will get you started, and in a companion post I will offer details about how to quickly share your curated content.


Want help with your content curation? Learn more about our content curation services!

Filed Under: Content Curation, Social Media

Blogging for Business – 10 Most Frequently Asked Questions

March 16, 2014 By Linda Dessau

Business woman with questions about blogging
© Syda Productions – Fotolia.com

As a business blog writer and consultant, I hear many questions, starting with, “Can you actually make a living doing that?” With customers heading straight to the web to find solutions to their problems, online marketing is no longer an option, it’s a necessity. And that makes what I do a necessity as well.

Here are 10 answers that will help any business owner market more effectively and connect with your customers online. I’ve grouped them into the three themes of blog planning, blog writing, and blog promotion.

Blog planning

1. What is a blog? A blog is a special section of a website that you update frequently with articles, news, and stories. The newest updates appear at the top of the page, with the older ones below. Posts are also organized by category. Example: Ask the Real Estate Team (Barrie, ON).

2. Should I blog/Why should I blog? No one HAS to blog, and you shouldn’t start unless you’re committed to blogging regularly for at least six months to give it a chance to produce results for your business. Reasons TO blog:

  • Stay visible to your audience so they think of you when they need your product or service. Example: Rooted Naturopathic Medicine Clinic (Barrie, ON).
  • Demonstrate your expertise about topics related to your business. Example: Rhonda Sherwood, Wealth Advisor for Scotia McLeod (Vancouver, BC).
  • Produce original content you can share on social media, to accomplish the first two goals in a variety of settings. Example: Summit Insight (Alexandria, VA)
  • Follow up with new contacts and prospective customers with links to information you’ve already written about questions they had.

3. Where should I blog? Recommended: Integrated into your own business website (Sample: Litchfield Builders, Hamden, CT). Next best thing: A separate site with the same branding, your own domain name, and clear links back and forth from the main site (Sample: Chilis). Not recommended: Blogging on “borrowed land,” like Blogger/Blogspot, WordPress.com, or Tumblr.

4. What should I blog about? A business should blog about things that will be interesting, relevant and helpful to your ideal customers. Start with a list of categories or themes you’ll write about. This helps you stay organized, and it also helps your readers find the answers they’re looking for.

Blog writing

5. How long and how often? While we’re hearing more now about the effectiveness of 1,000+-word blog posts, I still suggest that new business bloggers aim for 500 words for their feature articles. That being said, if you have more to say, and the additional words are purposeful and well-written, you no longer need to cut off your writing or arbitrarily divide it into multiple posts (for example, I’ll definitely need more than 500 words to answer these 10 questions!) For different types of posts (see the next answer for examples), 250-300 words is plenty.

6. Where do I find the time to blog? Blog posts don’t always have to be text-heavy or 100% original content, and these alternate types of posts can be quicker to write. For example, you can interview an expert about a topic that’s relevant to your customers, introduce or summarize a video or audio (your own or someone else’s), or review a book. (Here are some other blogging time management tips inspired by my greyhound Patch.)

7. Is it okay to copy someone’s article if I give them credit? No. Giving credit does not equal permission. You can quote one or two lines, but any more than that and you need explicit permission from the author. It’s better to just write some original commentary about why you like or recommend the content, then provide a link. (More suggestions about business blogging etiquette.)

Blog promotion

8. How do I get people to see my new blog posts?

  • Copy your post’s permalink (permanent link) from your web browser’s address bar (here is a video about how to find the permalink).
  • Paste the link into a status update box on a social media site, and then…
  • Add a brief teaser that tells the reader why they should read your post and how it will benefit them. Be consistent with the culture and norms of each network (e.g., you’re limited to 140 characters on Twitter, so don’t automatically copy the same message you’ve written for Facebook or it will be cut off and won’t make a good impression on your Twitter followers). Some titles, like this one by Debbie Ouellet (Barrie, ON), are compelling enough to use on their own (note that it already includes a question)! Your brand is a country. What’s it like to live there?
  • Email the link to someone directly if it’s a topic you discussed or you think they would enjoy/benefit from. (WiseStamp is an email signature tool that can automatically pull in the title and link of your latest blog post.)

9. How can I make my posts stand out on social media? Even with a catchy teaser, you still need to get people to notice that amidst everything else that’s constantly flowing into their social media streams. A colourful, attention-grabbing photo is the key to getting people to read even that short text, let alone click the link to read the whole post. Tip: On Facebook and Google+, upload a photo first, before you type your teaser and paste in your permalink. That way readers will see a full-sized photo rather than a thumbnail. [Update: July 17, 2015 – As of November 2014, Facebook is giving more visibility to posts that contain links with thumbnail images, versus those with uploaded photos.]

10. Where can I find photos to use legally? Just as you can’t reprint other people’s text, you also can’t automatically use other people’s photos without permission. To find photos you can share, I recommend Stock Exchange (free) – http://www.sxc.hu/, Photopin (free) – photopin.com and Fotolia (fee-based) – fotolia.com.

Thanks to the organizers and attendees of Small Business Connect in Barrie, Ontario, where I presented this information (with some technical difficulties). I’m glad to be able to deliver all the links and examples I promised!


Did you find this post useful? Please send one of these messages to your Twitter followers, or use the social sharing links below for LinkedIn, Facebook, or Google+.

  • Click to tweet: 4 steps to get your new blog post read by prospective customers via @lindadessau
  • Click to tweet: 10 things you’ve wondered about business blogging via @lindadessau
  • Click to tweet: 10 tips about blog planning, writing and promotion via @lindadessau

Filed Under: Benefits of Blogging, Blog Planning, Blogging Basics, Blogging Consistently, Social Media

  • « Go to Previous Page
  • Go to page 1
  • Go to page 2
  • Go to page 3
  • Go to page 4
  • Go to page 5
  • Interim pages omitted …
  • Go to page 16
  • Go to Next Page »

Copyright © 2025 All Rights Reserved · Privacy Policy · Website created by STUDIO dpi